Modularisation.. You cannot escape it as an Android Developer. As your code base gets larger well modularised code becomes crucial.
It can encourage code ownership, increased build speed, better organisation and increased productivity.
In a blog post a couple of months ago I focused on how modular indirection can improve project builds. Looking back on that post it is very “theory” heavy. I figured it would be nice to look at some practical aspects of modularisation.
I am relying on you having read my previous blog post. But if you don’t want to spend 10 minutes reading another blog post just to spend another 10 minutes here, I can give you a brief synopsis.
I am pursing the idea of splitting a code base into modules consisting of at least two modules: and api module and an implementation module. Api contains abstractions and your implementation contains concretions. The end result is a code base that should be easy to understand and quick to build.
Personally, I find modularisation is a huge topic and it getting a grasp on it is difficult. It encompasses Gradle, dependency injection, code architecture, builds, everything really. Implementing that is actually difficult.
This blog post continues the theme of adopting an api and implementation.
I want this post to be useful to those who work on a monolithic codebase and want to modularise. Also those who have a modularised code base but aren’t seeing the benefits they wanted.
When you’ve finished this post I want you to take two things from it.
- You should be able to create a plan to increase modularisation.
- You can make use of tooling to modularise your codebase
Without further ado, lets get to it.
Coming up with a plan
Modularising a code base is time complex and time consuming. It is a huge project that will impact your entire codebase.
Some of you work in large companies with foundation teams. Others will be working in small companies within a small team. All have stakeholders. Many of whom will rightly raise questions if you tell them you are going to re-architect your app. Especially with no forward facing changes. At the end of the day, your job is to deliver what others want us to do in our application.
If you are going to convince them its a good idea we need to come up with a plan. You wouldn’t just replace RxJava with Flow, Gson with Moshi or Volley with OkHttp. You’d research it, prove it is a good idea, and prove why it is a good idea. If you have a good mental model of what your stakeholders want you can align the benefits to them.
When it comes to modularisation, you should think about the key problems you are going to solve. Is it code ownership, build times, high coupling or something else?
Twitter has an environment of writing request for comments or 1-pagers. This is a fantastic way of spelling out your goals and to drill into the problems you are looking at. This is a good place to explore improvements specific to your code base. Create some examples or a small test project and share it in your team. When you are satisfied you can build your plan for the entire project. You can create a set of goals with explicit tasks to work towards. Put these into a document and refer to the document when you begin work. This will act as a north star for you and your team that you can all refer to.
Coming up with a plan is not specific to modularising a code base. This is a good practice for any software project. Doing this gives us time to think about what we are doing. There is a lot of value in thinking, rather than just doing.
Think about your foundation
If you are starting from a monolithic code base I have some suggestions for a good starting point. You should start by removing your foundational pieces from your monolithic codebase.
Think about it like this, if you are starting a new project you add your foundation first. You add networking, databases, analytics or serialisation before working on the features. We aren’t starting a new project, but we should replicate this.
Modularising a feature first will be troublesome. You’ll be trying to strip to reference foundational pieces without referencing your monolith. It gets gnarly, trust me.
I have found it overwhelming looking at a huge monolith. Untangling this spaghetti code is frustrating, but stick at it and you’ll work it out. To get a head start look into the network stack, analytics code, UI code or even utility code.
A note on networking code
A common approach I have seen is to add your api models in the network layer. This is a mistake, especially in a larger code base.
You don’t want your shopping cart module to have access to models in your login process. This is what having all models in a single module will introduce. You will pollute your code completion name space. It also leads to more incremental re-compilation should a model change.
A pattern I have seen at Twitter is the idea of adding modules named :model and :json. It sits alongside :api and :implementation modules. It keeps your network models and domain models in a nice logical place.
Gradle
For most Android developers, Gradle is the key to this whole process. Modularisation means creating more Gradle projects. We use the name modules a lot in Android, really it is an alias for a Gradle project.
I don’t know about you guys, but for a long time I was a bit scared of Gradle. I didn’t really know what it was doing or understand how it plugs together.
If you have ever felt the same or are currently a bit confused about Gradle I want this section to help make it easier. Modularising your code base will involve creating and moving Gradle projects about. Being confident doing this is important.
Gradle’s nomenclature is projects, Android developments is projects. Module is a better name for this blog post. From now on I shall use module.
A module is straightforward. The basic skeleton is a folder containing a single build.gradle.kts file.
To turn this module skeleton into a full module we need to reference to it from a project settings.gradle. Here is an example from a project I am working on, at the bottom you can see a manifest of all Gradle modules being declared.
rootProject.name = 'scheduler'
enableFeaturePreview("VERSION_CATALOGS")
apply from: 'buildSrc/dependencies.gradle.kts'

dependencyResolutionManagement {
    repositoriesMode.set(RepositoriesMode.FAIL_ON_PROJECT_REPOS)
    repositories {
        mavenCentral()
    }
}

include 'apps'
include 'core'
include 'apps:planner'
include 'core:flight-aware:api'
include 'core:flight-aware:json'
include 'core:flight-aware:implementation'
include 'core:flight-aware:implementation-fake'
include 'core:flight-aware:di'
include 'core:flight-aware:di-fake'
include 'core:flight-aware'
include 'core:networking:api'
include 'core:networking:implementation'
include 'core:networking:di'
include 'core:networking'
include 'core:billing:api'
include 'core:billing:implementation'
include 'core:billing:di'
include 'core:billing'
include 'core:flightplan-generator:api'
include 'core:flightplan-generator:implementation'
include 'core:flightplan-generator:di'
include 'core:flightplan-generator'
include 'core:schema'
include 'core:xml-parser'
include 'core:xml-parser:api'
include 'core:xml-parser:implementation'
include 'core:xml-parser:di'
And finally, we need to add a source directory to it.
A module is a set of folders, in the case of an api and implementation it might be a nested structure. But we reference them using colons instead of slashes. “core/xml-parser/api” becomes “core:xml-parser:api”.
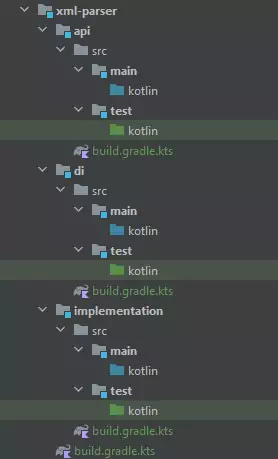 <figcaption>A number of modules containing source sets</figcaption></figure></div>When syncing a project Gradle uses settings.gradle as a manifest for all projects. Don’t forget to add your module here.
The build.gradle.kts file in your module defines the type of module. Applying a plugin defines if it is a Kotlin, Java or Android module.
The plugin applied defines the tasks that could be run during compilation.
I’d encourage you to create a new project and spending time manually creating modules. This could sound boring, but it will help you to understand what happens under the hood. In practice, you should use the “Add Module” wizard in the IDE. But you should have a good understanding of what happens under the hood.
With that basic set up I have a few module tips to share with you.
Favour JVM modules over Android modules
Where you can, favour plain Java or Kotlin modules rather than modules that use Android. When you hit the compile button each module has to run through many tasks. We should consider the tasks being compiled.
A Java module must run javac to convert your classes to JVM Bytecode. A Kotlin module must run kotlinc to convert your code to Kotlin IR and then JVM bytecode. An Android module must run kotlinc to convert your classes to Kotlin IR, then JVM bytecode and then dex it for the Android runtime. That sounds tiring!
It is wasteful running these tasks on modules that may not require it. Does your networking layer do anything that means it should specifically for Android?
If your target module is an Android library or application the Android steps will be done there. We do not need to do it for each module.
Doing this in each module might not sound dramatic. But if you had many modules running Android specific tasks you could imagine the impact. Not only does this impact incremental compilations, but even clean builds.
You should ensure your foundational modules, referenced across the application do not know about Android. This will benefit you in the long run.
To take this a step further, you should take time to think whether any module referring to these JVM modules really needs to know about Android. If it doesn’t, you can change the applied plugin from Android to JVM.
A word of warning, if a JVM module is referring to an Android module it will not work. So keep an eye out for this.
Sync less often
This won’t apply to everyone. But if you work in a very large codebase reduce syncing whilst modularising.
You might be breaking your :big-feautre module into :big-feature:api, :big-feature:implementation and :big-feature:di. Don’t sync after you’ve created each module. Set up the structure without using the IDE tooling and sync when you are confident you have things set up as you’d like.
This is a marginal gain, but will likely save you time and frustration. The Twitter for Android app has roughly 800 modules. Gradle sync currently takes about a minute. Modularising a code base is a long slog, don’t exhaust yourself by waiting for Gradle to sync.
If you can set up the base structure of an api/implementation module without syncing every time you add a module, you will be happier. You might also get a little dopamine hit doing it manually and seeing a successful sync.
Android Studio
Android Studio gets a lot of flack, in my opinion quite unfairly. It gives us a lot of tools that make our lives easier. Android Studio builds upon IntelliJ, providing helpful tooling that makes modularisation easy.
I warn you now, the tools I will suggest are not ground breaking. You may already be using them. But after this section I’ll suggest a couple of workflows that will combine the tooling.
Project Structure
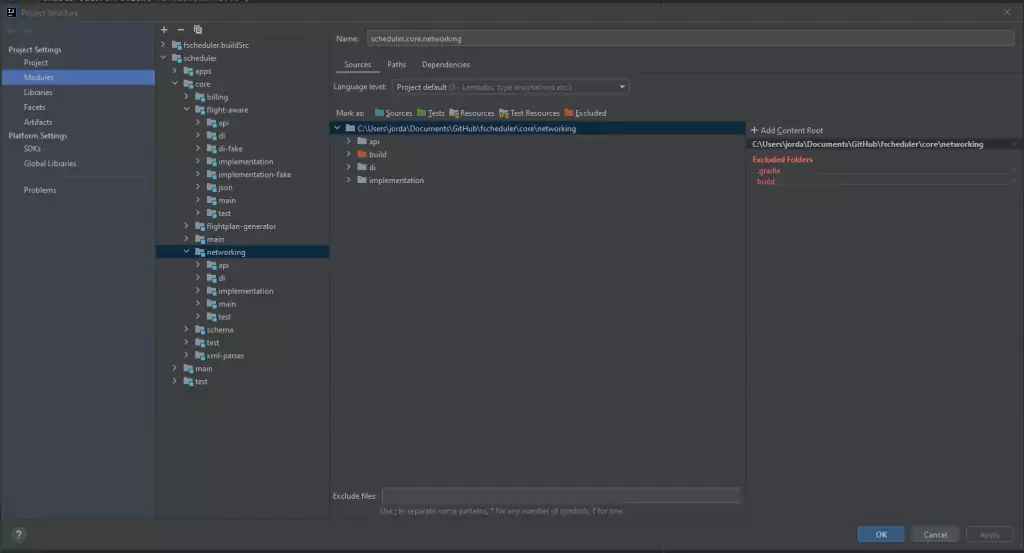
The project structure dialog is an excellent way to visualise modules in your code base. It is a bit like the settings.gradle file we saw above. It gives us a UI to navigate and visualise nesting.
Within the Project Structure dialog contains a wizard for creating new modules. It abstracts away from the details of Gradle and makes it painless to create modules. I do encourage using this, but make sure you know what happens under the hood.
One note of caution. Adding a new project starts a Gradle sync for you. If you work in a large code base this can become a productivity killer.
If you are adding a new module and then an api, implementation and di module. You could easily be doing this for 10 minutes.
I’m repeating what I mentioned above, but creating a multi-module set up and then syncing is useful.
Over time, this project structure view will become valuable to you as you tame a large project.
Extract Interface
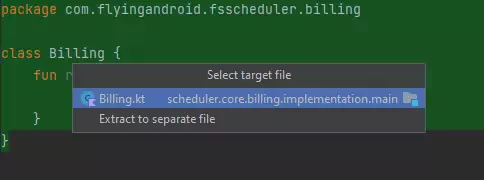
Extract Interface is very powerful for those who are already in a modularised code base. Using the Extract Interface codebase makes it easy to split concretions.

The tool allows us to extract a set of functions from a concrete class into a separate class. It will then rewrite your concretion and apply the interface to it. You also have an option to move your interface to another location. Like an api module, for example.
This one tool can do half of your work for you. It is a real productivity booster.
Move
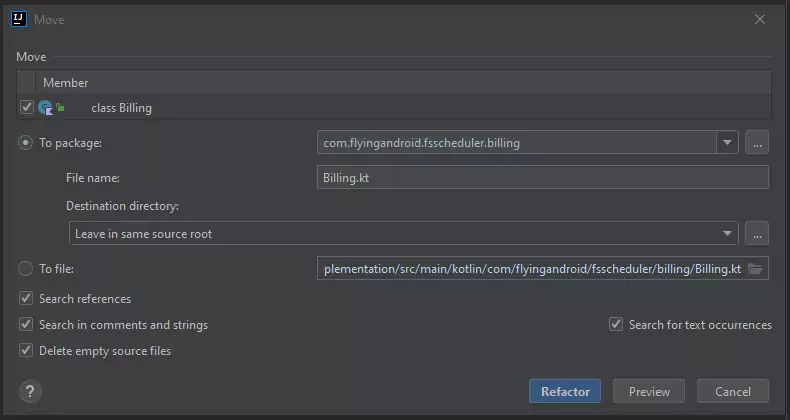
“Move” is useful when you already have abstractions. When you select a class or classes you can move them.
This is the second part of the “Extract Interface” defined above. Using this tool makes it easy to move classes throughout your code base.
Workflows
I want to propose a couple of workflows for you to play around with. My long term goal is to create tooling to compose the tools and tips above together. But, that isn’t necessary. If we follow some straightforward steps you can make modularisation a bit easier.
I haven’t proposed anything ground breaking above. But when composed together into a workflow they are useful. It makes it easy to apply an api/implementation architecture.
Migrating from a monolith
A few years back I would have expected this to be the most common use case. But browsing android projects on Github, I see many moularised projects. But I expect a lot of readers to still have monoliths. How can we compose separate tools together and break it apart?
- First, we create a plan. We keep digging into this code base and try to find a few foundational modules.
- Choose a foundational feature that will be depended on a lot, but have as few dependencies on anything else in your project.
- Create a module that will contain your new feature. Add a :api, :implementation and :di module.
- Move any dependencies that your new module depends upon to your new module. If your monolith is going to still depend upon any dependencies. You have a choice:
- If the dependency should eventually be hidden in your implementation, move it to be an api dependency in your :api module. Take note of it and plan to remove any leaking across boundaries
- If the dependency does still belong in your monolith, keep the dependency there.
- If your foundational classes are currently all concrete. Use “Move classes” to move everything to the implementation module.
- If your foundational classes contain a mixture of abstractions and concretions use “Move classes” the abstractions to api and concretions to implementation.
- Move dependency injection code to your DI module with “Move classes”.
- You might see a lot of red right now. Don’t worry!
- If you have any concretions that should be exposed in your api. Use “Extract interface” to extract and move an API to your api module
- Update any dependency injection classes to refer to the correct classes.
- Ensure your monolithic module is correctly wired up to your new modules. You will find yourself adding implementation and api modules to the monolith as we start.
Applying this process once won’t bring you immediate improvements. But over time, by repeating this you will eventually see the build improvements you want.
Migrating from a module
You’ll find this isn’t so dissimilar to the workflow above. We will take an existing module into an :api and an :implementation. This should not be very destructive and should involve fewer changes. You have already done the hard work of extracting this code from a monolith.
- Use the Project Structure dialog to add an :api, :implementation and :di module as children to your current module.
- Move your dependencies down into the implementation. If you have any “api” implementations, move that to your api module and take note to fix this.
- If all classes are concret. Use “Move classes” to move everything to the implementation module.
- If your classes contain a mixture of abstractions and concretions use “Move classes” the abstractions to api and concretions to implementation.
- Move dependency injection code to your DI module with “Move classes”.
- You might see a lot of red right now. Don’t worry!
- Replace any usages of this module to reference the api module and then add your di module to wherever you are building your dependency injection graph.
- Fix any remaining issues.
This seems simple, because it is! You will, of course, run into issues whilst implementing this. By following these steps the issues should not be too difficult to resolve.
Not exhaustive
If you’ve read to this part of the post you have entertained my musings for far too long. I hope you step away from this with a good idea of how to do a few things.
If you haven’t begun modularising your code base you will now think look at your code base and understand the foundational pieces of code that you can break apart and begin the process of creating a modularised code base.
You’ll feel a bit more comfortable thinking about Gradle modules. You might think it was odd to focus on this as much as I have, but I think this is something we must all be comfortable with.
You can also make use of three very simple pieces of functionality in Android Studio to accelerate your modularisation process. When combined together into one of the two workflows I have suggested you can effectively re-organise your code base.
That’s all I have for now. Ciao!