In my last blog post I made a top-level overview of how a modular codebase can look with a level of indirection. The api and implementation division addresses build time issues across our code base. This architecture isn’t enough.
There is a problem in our architecture that we should address in more detail. If no modules reference an :implementation we can’t create objects we need.
This post introduces the :di module and discusses how it enables dependency injection. All while hiding :implementation and maintaining acceptable incremental build times.
What is Dependency Injection?
I don’t want to go into the details of dependency injection in this blog post. But to ensure you and I are on the same page I would suggest a read of this post from the Android developer website.
Dependency injection should provide dependencies to objects without betraying the source of dependencies. Dependency injection plays well with the dependency inversion principle. You should identify dependency inversion throughout the previous post.
In this project architecture, think of dependency injection as a supply chain. It starts with an :implementation and then delivers :api to consumers.
The :di module is going to use Dagger to to build our dependency injection graph.
How does dependency injection work?
To construct a class we need to know about the dependencies of the class. For example, the parameters to a class’ constructor.
To create an object we need to create the dependencies. To create dependencies we need to know their dependencies. Then the dependencies of those dependencies. So on.. so forth. You get the idea. This forms a dependency graph.
This dependency graph”is a directed graph. It is like the Gradle project graph. Each node represents an object, or how to make an object.
Each edge represents a dependency required to create the object the edge departs from.
My tool of choice for building a graph is Dagger. There are many ways to do build the graph. But I have experience with Dagger and I am confident with it. I like the compile time guarantees that come along with it.
Next up, a whistle stop tour of some of the key parts of Dagger and where they fit into our dependency graph.
@Component
A @Component annotated class is a dependency graph. It can act as a complete or partial dependency graph. We can add nodes and edges to a graph with a reference to a @Module. We can connect another graph to ours by connecting it to another @Component.
@Module
A @Module annotated class defines nodes and edges in a dependency graph. A node is either a @Provide or @Bind annotated function.
Edges are parameters to a @Provide function. Or, the parameters to the constructor of a class passed to a @Bind function.
@Inject
Annotating a constructor with @Inject tells Dagger that this class is a node. Whilst useful, we should limit usages of @Inject. We can create concretions with it. Or on classes we know are only consumed in :implementations.
A visualisation
This sounds great in text. But as always a visualisation of how this relates to a dependency graph will help.
I’ve used OkHttp in the example and I hope there are some familiar concepts in there.
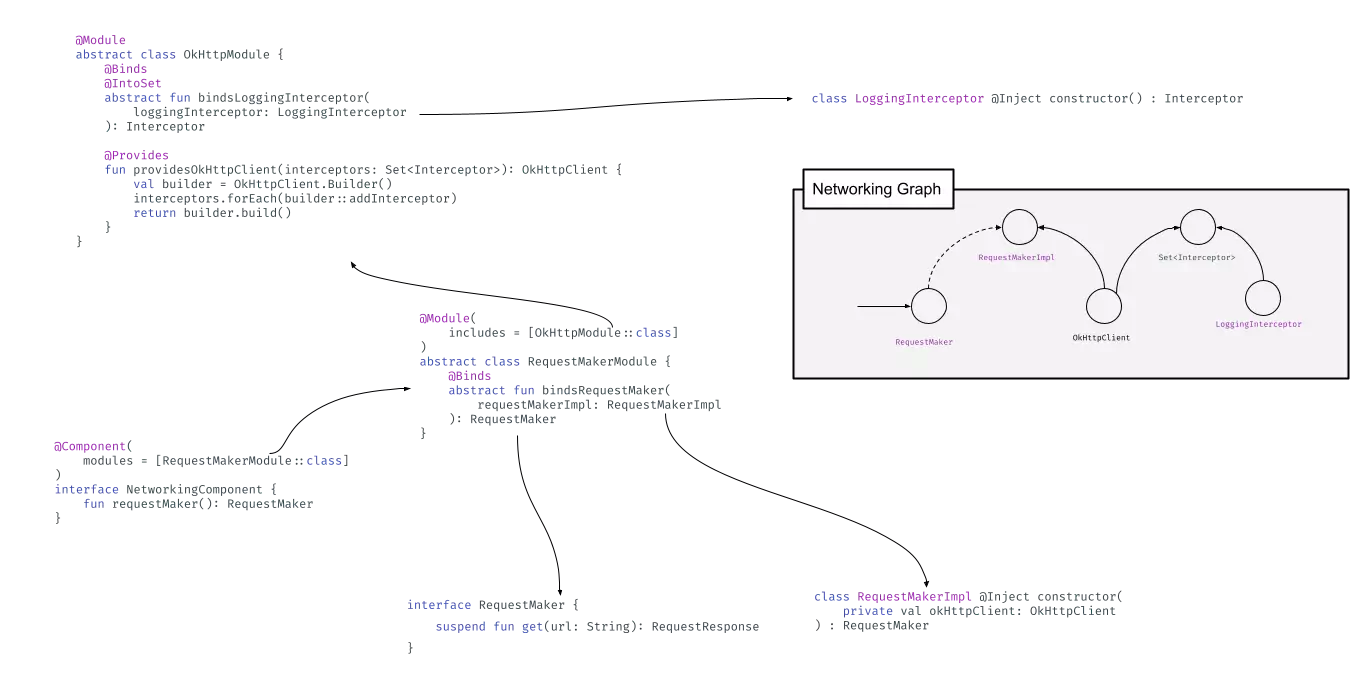
We can see how the Dagger infrastructure builds ourselves a dependency graph. The component contains the graph and modules are contributing nodes and edges to the graph.
Components can reference components. This is useful when we want to use dependencies that come from a separate dependency graph. This is going to be a key concept going forwards.
Aligning the graphs
The project graph tells us how different projects relate and form an application. The dependency graph tells us how the objects inside glue together to make other objects.
The two graphs relate, but.. also don’t relate. Gradle creates the project graph. It enables the dependency graph created by Dagger. But, it doesn’t know anything about it.
Using the :di module we can align the two graphs and attempt to create a single mental model. This will help developers working with this architecture.
If we draw both graphs separately and then together we can see that the two graphs do align.
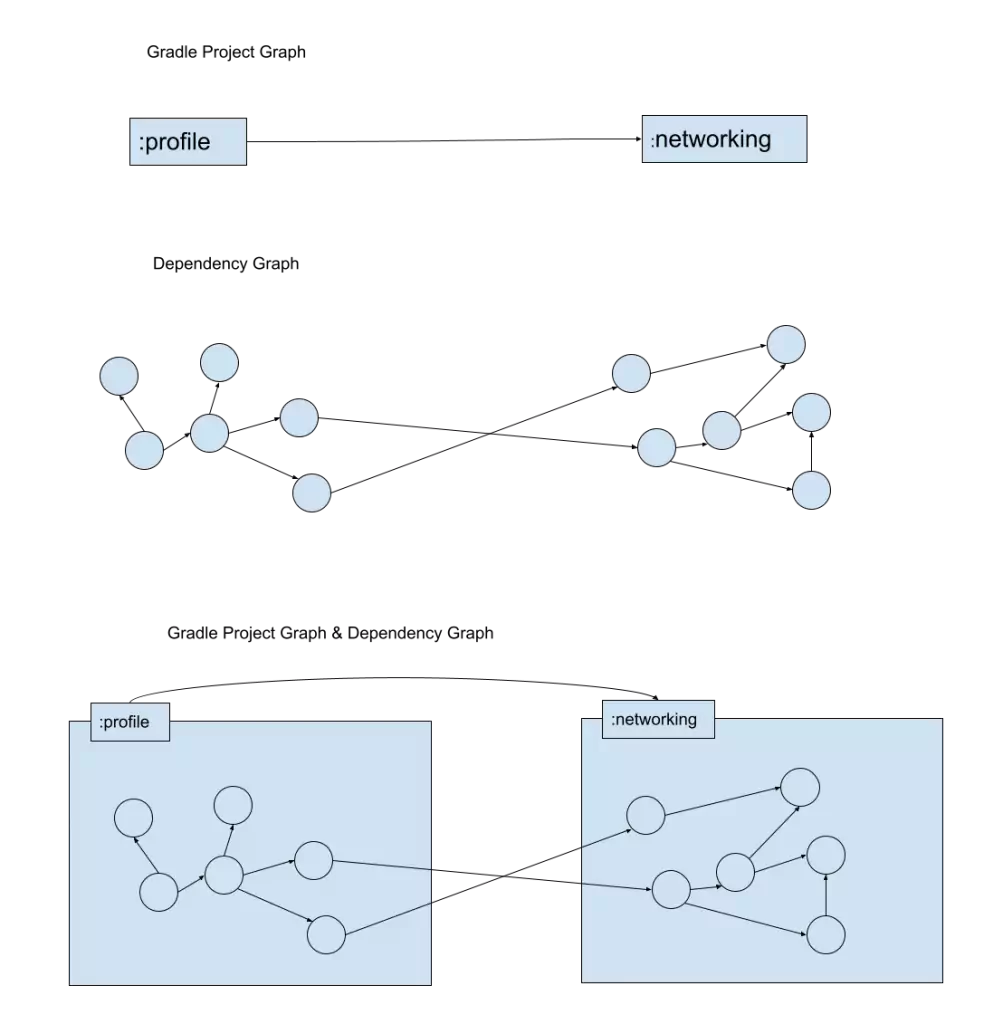
Project relationships enables objects inside projects to have a relationship with each other.
The combined graph above gives us information about the structure of our code. It will help us in our mission to modularise with indirection:
- Cross boundary object references state our public api. They belong in the :api module.
- Classes not referenced outside of a project must be encapsulated within an :implementation module.
Modifying our :networking project to align with our new model. Gives us the same graph, but with a bit of a split between them. We are going to use the :di module to indirectly maintain the relationships between project and object that we saw above.
Introducing the :di module
The :di module handles providing the :implementation in the shape of the :api module. To me, this is the module that is used to make our Dagger graph align with the project graph.
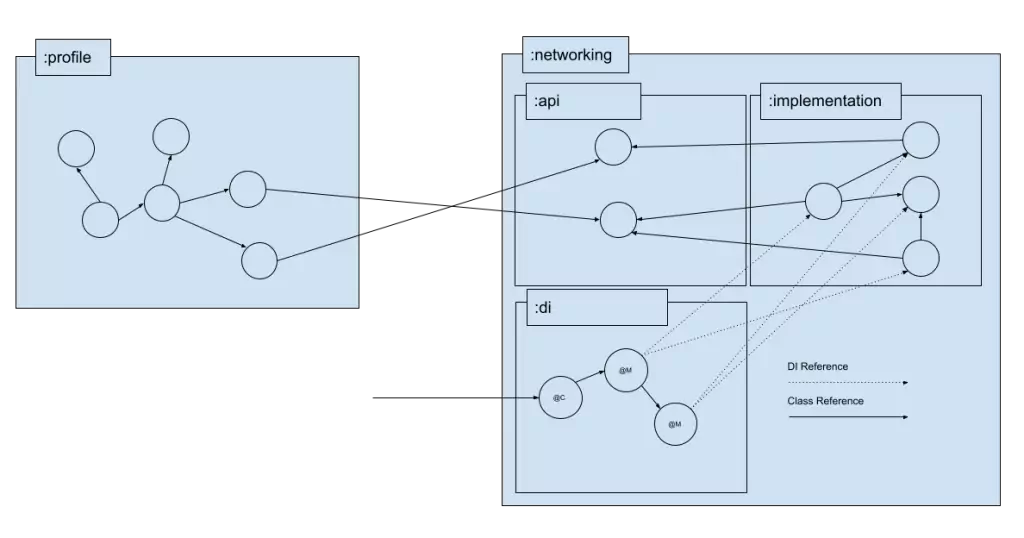
The :di module above contains component and module classes; the graph and the nodes and edges.
We should treat the component as the single Dagger entry point into a Gradle project. There are a couple of rules to follow in our :di module:
- Components should be public. They are the only objects in our :di module that can be referenced across project boundaries.
- Modules should only have an internal modifier. Never reference a module across project boundaries.
The :di project itself should reference two other local projects: :api and :implementation. This gives the project the ability to upcast and concrete classes into their abstractions.
If :implementation modules are only referenced in a couple of places. Never in the places they are actually needed. There is no way to actually create the objects without the :di module.
How to use the :di module
The parent of the module should only be referenced directly by it’s parent project. The :di module glues together components. For example, a :profile:di module might look something like this :networking:di.
<pre class="wp-block-code">```
@Component(dependencies = [NetworkingComponent::class])
interface ProfileComponent {

    fun inject(profileActivity: ProfileActivity)

    @Component.Builder
    interface Builder {
        fun addDependency(networkingComponent: NetworkingComponent): Builder
        fun build(): ProfileComponent
    }
}
```
A real project is going to be a bit more complex than this small example. As more projects are referencing each other our components will compose together creating a larger and larger dependency graph.
The composed components will be referenced in a project that applies an android application plugin. If the projects and components are correctly set up then any projects depending on an :api module will receive the fully resolved implementations.
Whilst this does bring some complexity to our project set up it does maintain the incremental build time improvements we really want to maintain from the previous blog post. If an :implementation module changes it will only invalidate any related :di projects. This is an acceptable cost for delivering concretions throughout our application.
Validation
In the last blog post I wrapped up with a short bit on how we can validate the project graph and prove that the :implementation module is used correctly.
We can do the same here and prove our :di module is used correctly. Here are a couple of rules:
- A :di module can only be referenced by another :di module or by it’s parent module.
- A :di module can only reference a :di module if it’s sibling :implementation module references an :implementation
The combination of the above ensures the module structure has been correctly wired together and the object supply chain will work as expected.
I think this post has only really scratched the surface of how dependency injection is important. I think I could go into much, much more detail about each point here. But I don’t want to write a book! I hope I’ve at least painted a picture on how crucial dependency injection is in our modular indirection.